Shopify Integration
Epinium connects to your Shopify store through an app that you create yourself, in your own Shopify account. There is no longer a shared Epinium app: every store has its own, with its own credentials, and only you have access to them.
The setup starts in Shopify, not in Epinium: you configure your app in Shopify's developer panel and, at the end, come back here to paste three pieces of information and finish the connection.
The screenshots are in Spanish
This guide's screenshots were taken with the Shopify panel set to Spanish. Yours will appear in the language of your Shopify account, and some button or field names may vary slightly between languages or as Shopify updates its interface. Follow the order and position of each screenshot: they are the same for every language.
Before you start
- Administrator access to your Shopify store.
- A Shopify Partners account: it's where the app gets created. If you don't have one, you create it in step 2.
- About 10-15 minutes. The process has quite a few steps, but each one is simple.
- Two tabs open: this guide, and Settings → Connections in Epinium. You will copy data from one screen to the other several times.
Step 1: find your store's address
Before touching anything in Shopify, you need one piece of information: your store's internal address, the one ending in .myshopify.com (for example, my-store.myshopify.com). You will find it in your store's admin panel, under Settings → Domains, listed as the store's Shopify domain. Note the part before .myshopify.com: you will need it twice more later on.
It is not the domain your customers see. Even with a custom domain connected, Shopify always assigns every store an internal .myshopify.com address, and that is the one required here: mixing up the two is the single most common mistake in the whole process.
Step 2: open the Shopify Dev Dashboard
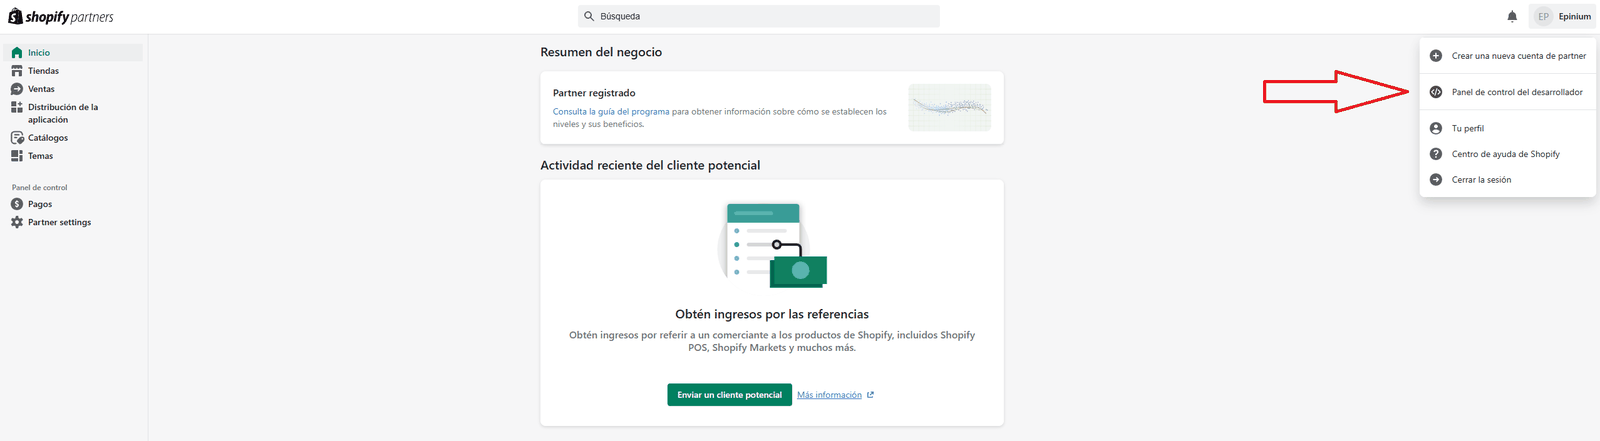
Sign in at partners.shopify.com with your Shopify Partners account, or create one if you don't have one yet.
Click your account name, top right, and select "Dev Dashboard".
Step 3: create the app
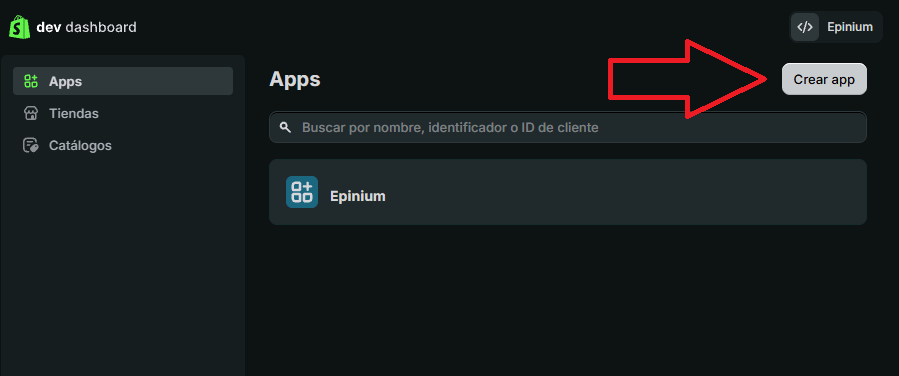
In the Dev Dashboard, go to the Apps section and click "Create app", top right.
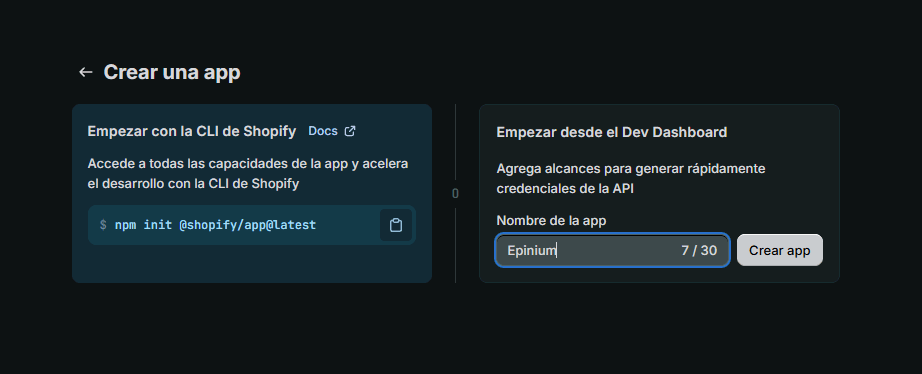
Shopify offers two ways to create the app. Use the one on the right, "Start from the Dev Dashboard": type a name for your app (for example, your store's name) and click "Create app".
Step 4: configure the permissions Epinium needs
Shopify takes you to the configuration screen for the new version of your app. Scroll down to the "API access" section and find the "Scopes" field.
Now open, in another tab, Settings → Connections in Epinium and find the Shopify card (the same screen shown in step 13's screenshot). There you will see the full list of permissions your app needs to declare, with a button to copy it in one go - always copy it from there, never from a document, and paste it into Shopify's "Scopes" field.
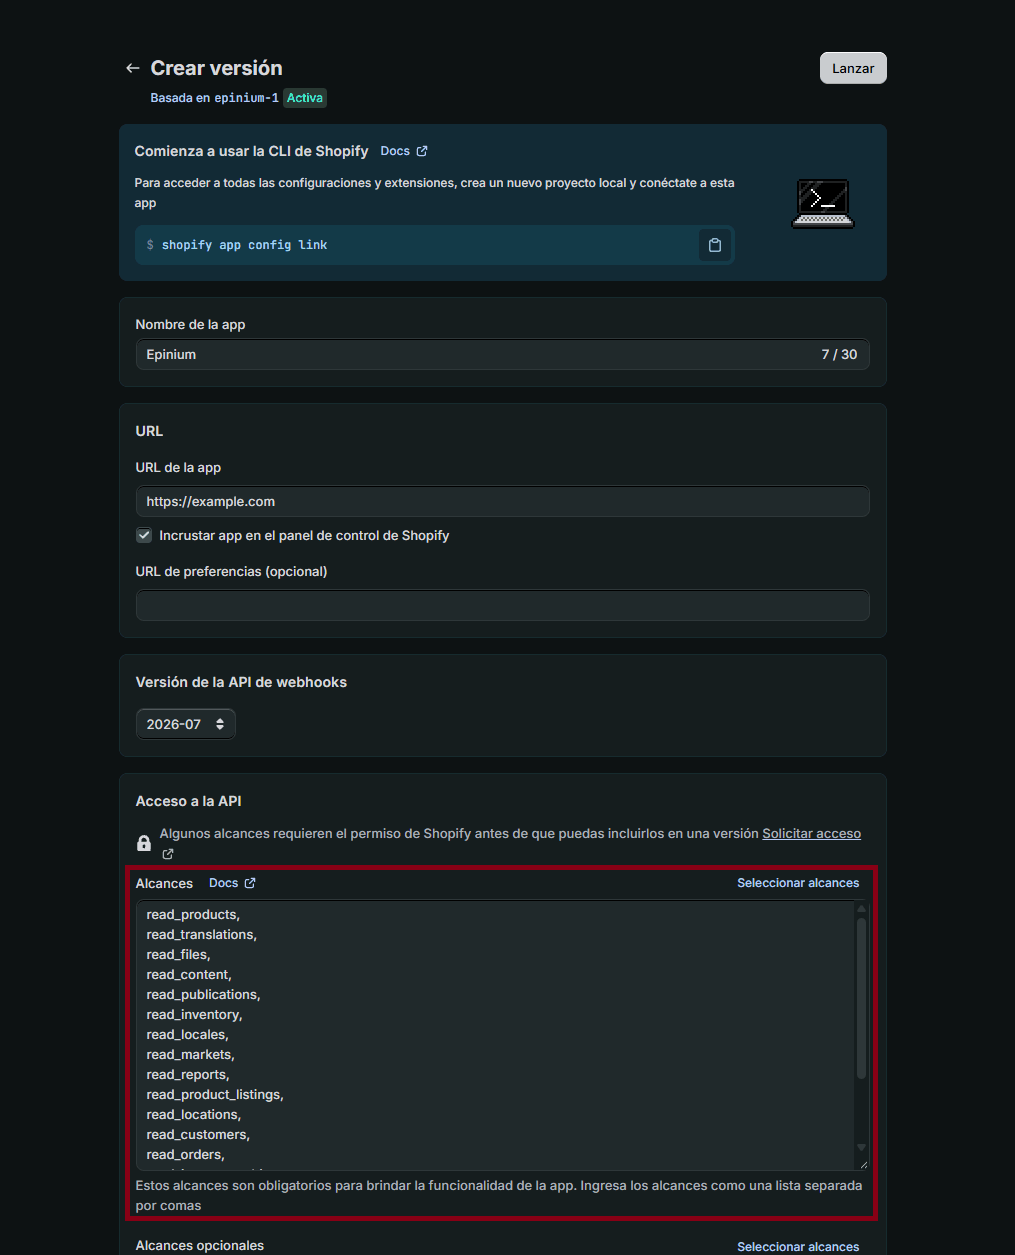
While you are on this screen, also fill in the "App URL" field with https://app.epinium.com/settings/connections: it is the Epinium screen Shopify sends you back to after you give your consent. You can leave the rest of this section's fields as they are.
Step 5: set the redirect URL and release the version
Further down the same screen, find the "Allowed redirection URL(s)" field. Go back to the Shopify screen in Epinium (the same one from step 13) and copy the redirect URL with its own copy button - it's the other piece of data shown next to the permissions list. Paste it here.

When you are done, click "Release", top right, to publish this version of your app.
Step 6: copy the client ID and secret
In your app's left-hand menu, open "App setup". In the "Credentials" section you will see the "Client ID" and the "Client secret" (click the eye icon to reveal it). Copy both using the copy icon next to each one: you will need them at the end of this guide.
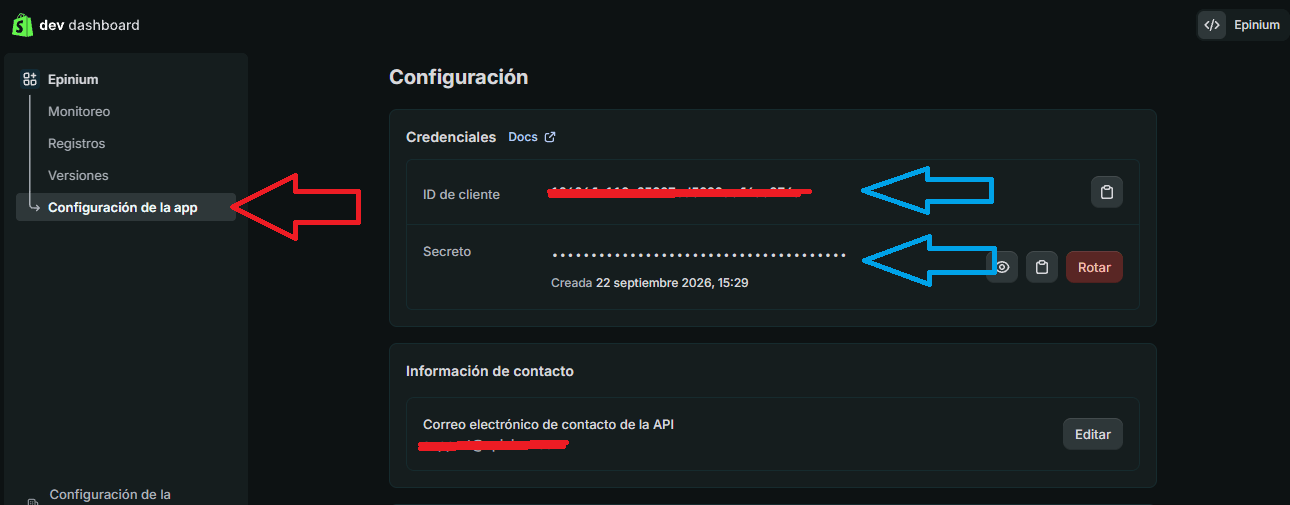
Don't click "Rotate"
The red "Rotate" button generates a new secret and invalidates the current one. If you already have a working connection in Epinium using this secret, rotating it breaks that connection: you would need to reconnect with the new secret.
Keep both values somewhere safe: Shopify only shows you the secret on this screen.
Step 7: find your app in the distribution panel
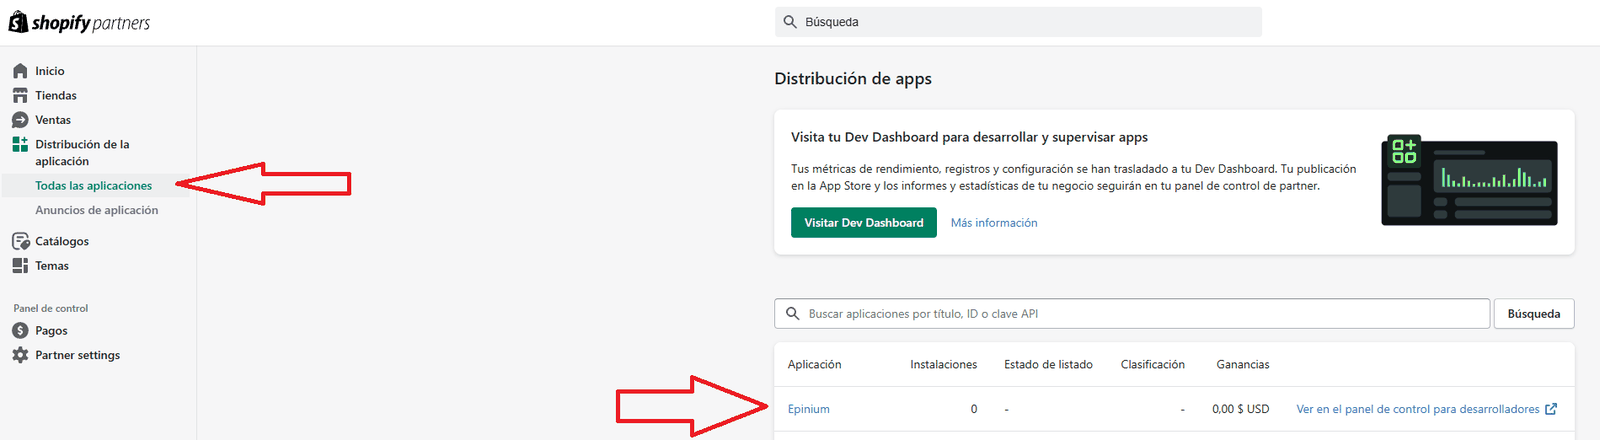
Go back to the main Shopify Partners page (not the Dev Dashboard). In the left-hand menu, open "App distribution" → "All apps" and click your app's name.
Step 8: choose how the app is distributed
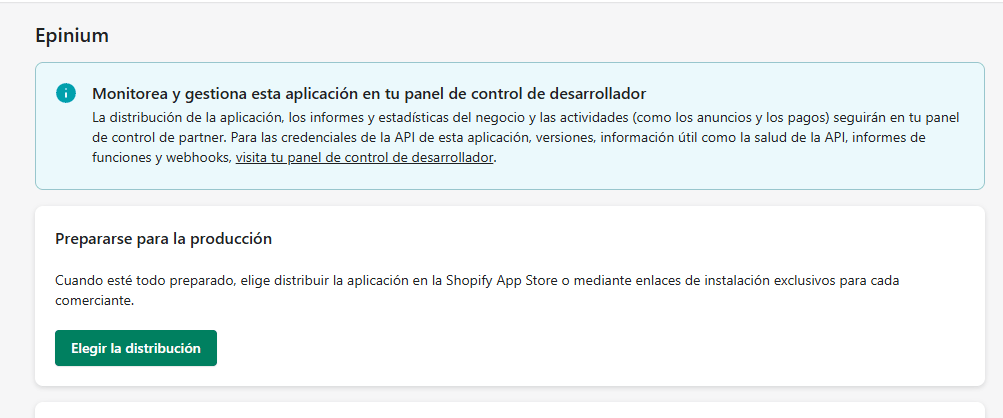
On your app's page, click "Choose distribution".
Step 9: select custom distribution
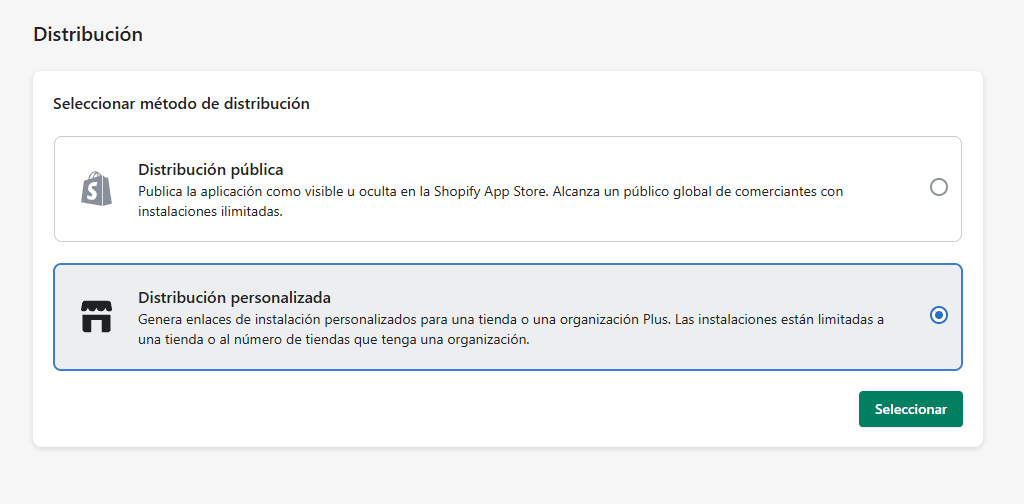
Shopify offers two options. Choose "Custom distribution" - "Public distribution" is for publishing on the Shopify App Store, and that's not what you need - and click "Select".
Step 10: enter your store's domain
Type the .myshopify.com address you found in step 1 and click "Generate link". Leave the multi-store checkbox as it is, unless you know your organization has more than one Plus store.
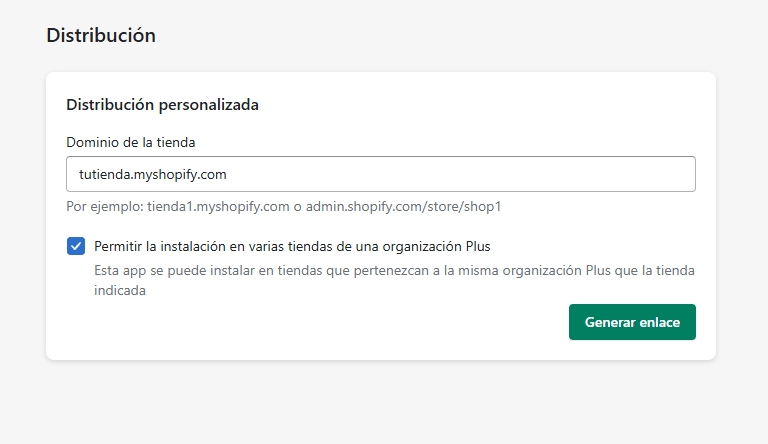
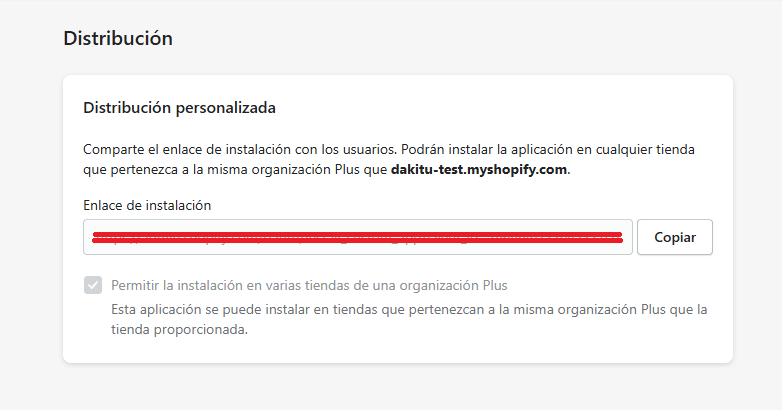
Step 11: copy the install link
Shopify generates a unique link for your store. Copy it with the "Copy" button.
Step 12: install the app on your store
Open the link you just copied in a new tab, signed in as your store's administrator. Shopify shows you what the app needs access to, grouped by data type, and an "Install" button.
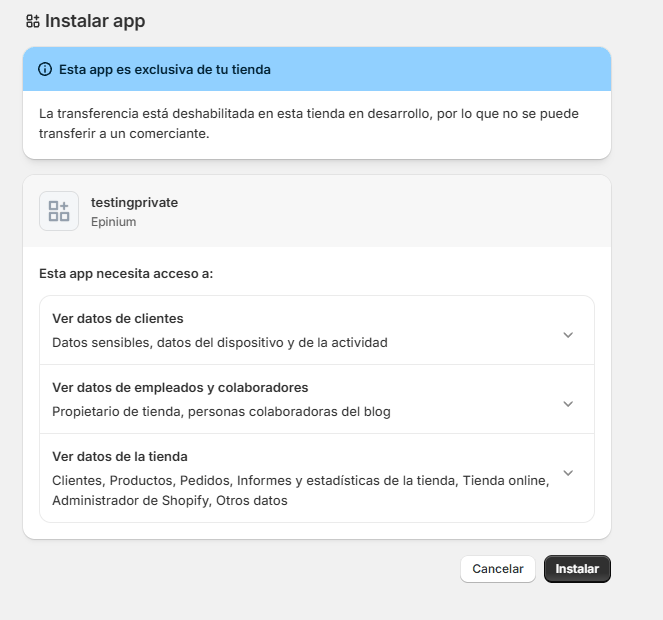
This is the screen where you approve, all at once, every permission on the list you pasted in step 4. Review them and click "Install".
Step 13: go back to Epinium and finish the connection
With the app installed, go to Settings → Connections in Epinium and find the Shopify card:
- Enter your store's domain (the same one from step 1).
- Paste the Client ID and the Client secret you copied in step 6.
- Click "Connect".
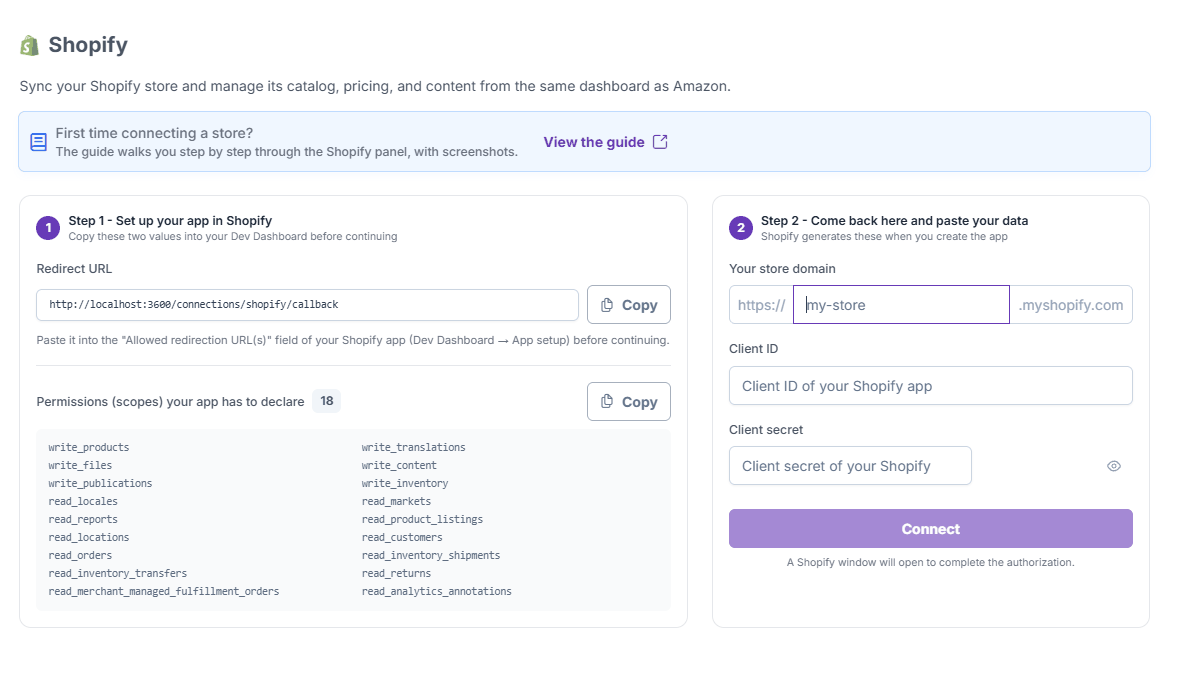
A Shopify window opens to finish authorizing access. Once it closes, your store is connected and available to the Epinium tools that use it.
Your data and the AI model
Epinium does not retain your Shopify data or send it to any AI model of its own. If you use AI features on your catalog, you choose and pay for the model you prefer, connecting it yourself.
Common issues
Epinium doesn't recognize my store after installing the app
Most common cause: the domain entered in Epinium doesn't exactly match your store's .myshopify.com address (step 1).
Solution: check that the domain has no uppercase letters, spaces, or your custom domain - for example, mystore.com instead of mystore.myshopify.com.
The connection stalls, or Shopify never completes the authorization
Most common cause: your app's "App URL" and "Allowed redirection URL(s)" in Shopify don't exactly match what steps 4 and 5 describe. Shopify doesn't warn you when one of the two is wrong: the process simply never completes.
Solution: go back into your app's configuration in the Dev Dashboard and carefully check both URLs against what you copied from Epinium.
I rotated my app's secret and the connection stopped working
Cause: each Epinium connection uses the secret you gave it when connecting. If you rotate it in Shopify, or create a new app, the old secret stops working.
Solution: go to Settings → Connections, open that store's connection again, and paste the new Client ID and Client secret.
Need more help?
If the issue persists after following these steps, contact the Epinium support team via the platform chat or at support@epinium.com.